Chroma subsampling is why the same JPG setting looks perfect on a photo and smeared around red text. We saved a red letter on blue two ways at an identical quality: default 4:2:0 sampling, and full 4:4:4. 0.12% of the pixels come out a visibly different colour between the two, every one of them on the letter's edge, and 4:2:0 is 38% smaller for it.
Do you actually need to worry about this?
Probably not, unless your image or video has flat, saturated colour sitting right against another flat, saturated colour.
- Ignore it for photographs, scans, and anything with natural gradients or texture. Convert PNG to JPG at the default settings and the colour loss is real but far too small to see, which the numbers below cover.
- Watch for it with screenshots, screen recordings, code editors, subtitles, and slide decks, anywhere a UI puts saturated text directly on a saturated background.
- Know it can't be fixed after the fact. Converting MOV to MP4 copies the video stream rather than re-encoding it, so a recording that already looks fuzzy stays exactly as fuzzy, no better and no worse.
4:4:4, 4:2:2 and 4:2:0 at a glance
| 4:4:4 | 4:2:2 | 4:2:0 | |
|---|---|---|---|
| Chroma resolution vs. brightness | Full, every pixel | Half horizontally, full vertically | Quarter: half in both directions |
| Chroma samples per 720 brightness samples, one scan line | 720 | 360 | 360, shared across two lines |
| Where you'll meet it | Apple ProRes 4444, lossless and near-lossless workflows | Apple ProRes 422, broadcast studio interchange | Nearly every JPG you save, and almost every MP4 |
The 4:2:2 row's sample counts come straight from ITU-R Recommendation BT.601-7, the digital television standard that first formalised the notation: Table 3 specifies 720 luma samples and 360 colour-difference samples per active line. Apple's own ProRes white paper confirms where the higher ratios actually live today: ProRes 422 targets "4:2:2 image sources," and ProRes 4444 targets "4:4:4:4 image sources," both professional editing formats, neither one a format FileFlip's converters produce.
What does 4:2:0 actually do to red text on blue?
We built a 640 by 260 pixel image, solid blue background, a single red letter, and saved it as a JPG twice at quality 85, once with -sampling-factor 4:2:0 and once with -sampling-factor 4:4:4, the only setting that changed.
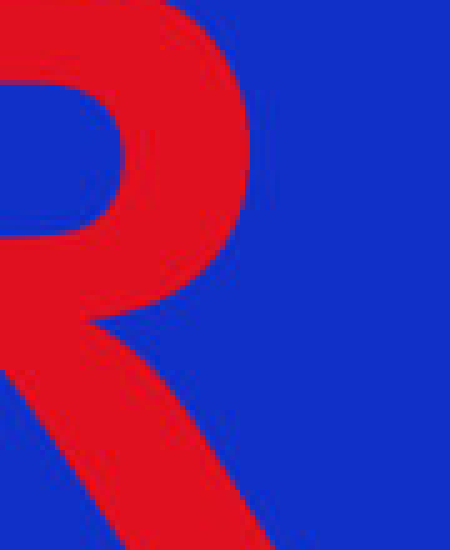
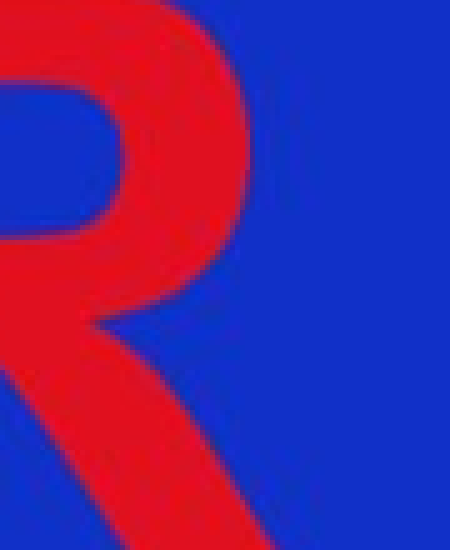
Both files came from the identical source PNG at identical quality 85. The left edge of the letter is visibly softer at 4:2:0. Magnified 5x from a 90 by 110 pixel crop.
Comparing the two files pixel by pixel, with a 5% fuzz tolerance so ordinary JPEG noise doesn't count, 202 of the image's 166,400 pixels differ, all of them sitting on the letter's outline. Run the SSIM of each version against the untouched source and the brightness channel is identical either way, 0.9985, because subsampling never touches luma. The colour channels are not: 4:2:0 scores 0.9864 and 0.9868 on the two chroma channels, 4:4:4 scores 0.9944 and 0.9963.
- 4:2:0 (default)3,688 bytes
- 4:4:45,928 bytes, 61% bigger
Same red-on-blue source, same quality 85, only the sampling factor changed. Turning subsampling off is not free.
Turning subsampling off comes at a real cost: the 4:4:4 file is 61% bigger for a fix that only touches 0.12% of the pixels. That's the actual trade-off, not a hypothetical one.
Why do encoders throw brightness and colour into separate buckets at all?
Because separating them is what makes subsampling possible in the first place, and it costs nothing to do. A JPG or a video frame isn't stored as red, green and blue values per pixel. It's converted to one brightness signal, Y, and two colour-difference signals, usually called Cb and Cr, following the construction ITU-R BT.601-7 lays out in section 2.5: Y is a weighted sum of red, green and blue, and Cb and Cr are what's left over once you subtract Y back out. That conversion alone loses nothing; RGB and YCbCr carry the same information, just organised differently. The reorganisation is what matters, because once brightness and colour live in separate channels, an encoder is free to treat them differently, keeping every brightness sample while throwing away most of the colour ones, betting that a viewer's eye will fill the rest back in from the sharp brightness edges nearby. On an ordinary photograph, that bet almost always pays off, which our own numbers below confirm directly.
Where is chroma subsampling actually invisible?
Almost everywhere that isn't a hard, saturated colour edge, including most of a photograph that has one.
We ran the identical 4:2:0-versus-4:4:4 comparison on a real photograph instead of our synthetic letter, one of the 12 Kodak True Color images, same quality 85, same fuzz tolerance. Only 34 of its 393,216 pixels differ, 0.0085%, against 0.12% for the letter, meaning our worst-case synthetic edge shows the effect at roughly 14 times the rate of an actual photo. A photograph mostly lacks the one condition that makes subsampling visible: a fully saturated colour bordering a different fully saturated colour, with nothing in between and no texture nearby to hide the seam. Skies, skin, foliage and fabric all shade gradually, which is exactly what subsampling handles well.
The size cost runs the other way. Turning subsampling off cost the letter image 61% more but the photograph only 18% more, because a photo's colour channel already holds real detail worth encoding at full resolution; a flat graphic's colour channel is nearly empty either way, so paying for every sample of it is proportionally a bigger waste.
Why does a screen recording's coloured text come out fuzzy?
Because a screen capture is exactly the pathological case: flat UI colours, sharp vector edges, and often exactly the red-on-blue or red-on-black combination that subsampling handles worst. A terminal with a coloured prompt, a code editor with syntax highlighting, or a slide with a red headline on a dark background all put saturated colour directly against saturated colour, with none of the texture that hides the seam in a photograph.
Converting the recording afterward can't make this better or worse. MOV to MP4 on FileFlip is a remux whenever the codec already fits, which we measured directly: the compressed video stream is copied across unchanged, hash-identical, because changing the container isn't the same operation as changing the codec. Whatever chroma sampling the screen recorder used the moment it hit record is the chroma sampling the file has for good.
What can you actually control?
Not the sampling factor directly. FileFlip's Advanced options for images expose a Quality slider, 1 to 100, and nothing that names chroma sampling on its own.
What that slider does control is the one lever that matters: push Quality to 90 or above on a PNG to JPG conversion and the encoder switches to full 4:4:4 sampling automatically, the same behaviour we relied on to force 4:2:0 for the tests above by setting it explicitly below that line. Below 90, you get 4:2:0. There's no setting in between exposed in the UI, and video has no equivalent control at all, since FileFlip's video conversions remux rather than re-encode whenever the codec already fits the container.
Common questions
Does converting a fuzzy JPG to PNG fix it?
No. PNG is lossless going forward, but it can only preserve whatever pixels it's handed. Once 4:2:0 sampling has blended the colour at an edge, that blend is now the picture; a lossless format just stores the blended result losslessly.
Is chroma subsampling the same thing as JPEG's usual compression?
No, they're two separate decisions that happen to ship together. JPEG's main compression, the DCT quantization step, discards detail from every channel, including brightness. Subsampling is a separate step that only ever touches the two colour channels. Our grayscale control proved this directly: run the identical quality setting through both sampling factors on an image with no colour information at all, and the two output files are byte-for-byte identical, because there was nothing in the colour channels for a different sampling factor to change.
Does 4:2:2 split the difference?
Yes, but you won't run into it through FileFlip. 4:2:2 keeps full vertical colour resolution and only halves the horizontal, a middle ground built for professional video interchange, not for a JPG or a consumer MP4. Apple's ProRes family is where it actually shows up.
Will a higher-resolution screen recording avoid the problem?
No, and this is worth saying plainly: more pixels means more edges for the same 2x2 subsampling block to blur, not fewer. Resolution and chroma sampling are independent settings; doubling one doesn't touch the other, which is a distinct question from how resolution affects file size generally.
Convert between them
FileFlip converts PNG to JPG and MOV to MP4 entirely in your browser, on the same ImageMagick and FFmpeg builds this page's numbers came from. Nothing uploads and there's no account. The Quality slider under Advanced options is the closest thing to a chroma control a PNG to JPG conversion has; the MOV to MP4 route has none, because it copies the existing stream rather than building a new one.
See the JPG, PNG and MP4 format references for what else each one can hold.
How we measured this
- Synthetic source: a 640x260 PNG, solid
#1030C8background, one#E01020letter "R" at 170pt Arial Bold, built with ImageMagick. A second, colourless version used#202020and#E8E8E8in place of the blue and red. - Encodes:
magick source.png -depth 8 -sampling-factor 4:2:0 -quality 85 out.jpgand the same command with-sampling-factor 4:4:4, holding quality and every other setting constant. - Pixel difference:
magick compare -metric AE -fuzz 5% a.jpg b.jpg diff.png, comparing the two sampling factors directly against each other, and separately each one against the untouched source. - SSIM: FFmpeg 8.1.2's
ssimfilter, both inputs explicitly converted toyuv444pfirst withformat=yuv444pso the comparison itself never re-introduces subsampling as a side effect of format negotiation. - Photograph: kodim05 from the Kodak True Color set, 768x512, run through the identical pair of encodes and the identical AE comparison.
- Default sampling factor:
magick identify -format '%[jpeg:sampling-factor]' file.jpgon files saved at quality 70 through 95 with no-sampling-factorflag set, to find where ImageMagick's own default switches from 4:2:0 to 4:4:4. - Tools: ImageMagick 7.1.2-28 Q16-HDRI and FFmpeg 8.1.2, on macOS. FileFlip runs the same libraries compiled to WebAssembly, so a quality value or a sampling factor means the same thing here as it does in the product.
- Caveat: one synthetic letter and one photograph are two data points, not a survey. A different font, a different pair of colours, or a different photograph will move the exact percentages; the direction, an order of magnitude more visible difference on a hard saturated edge than on a photograph, is the part that should hold generally, because it follows from how 2x2 block subsampling works rather than from anything specific to our source images.